Where to create the table. Removing and adding elements
Good day to everyone, my dear friends and guests of my blog. Today, if you don’t mind, we will continue to tinker with the Microsoft Word text editor. Due to my line of work, I often have to deal with him, so I can’t ignore him.
And today we will work with tables. Yes. Without this, our business is simply nowhere. But many people don’t even know how this can be brought to life, much less in several ways. Therefore, I will tell you how to draw a table in Word, using several different options and methods. I will do this as usual in Office 2013, but if you have 2010, then this article will also be relevant. Ready? Then let's go!
Insert
Our first method will be the simplest and most classic, namely a regular table insertion. We don't need any supernatural abilities here. You just need to set the number of rows and columns.
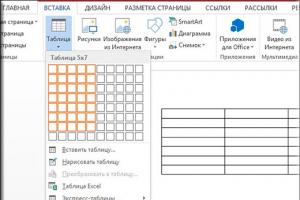
Log in to Word and go to the “Insert” menu, then select “Table” and visually use the squares to select what your table will look like in real time. If you are satisfied with everything, then simply click the left mouse button at the desired point. True, this line has a limited number of rows and columns. In this case, another option will help us.

To set a certain number of columns and rows, we need to enter the same section again, only this time select the item "Insert table".
A new window will appear where you will be asked to select the required number of rows and columns.

Drawing
A fairly convenient way to create a sign is to draw it. That is, here you yourself choose initially what it will look like for you. In order to bring this to life, we need in the same item “Insert” - “Table”, and then click on "Draw a table". Your cursor should change to a pencil.
We will use this pencil to draw our sign. To do this, hold down the left mouse button on one edge and move it to the other lower edge, after which we release our rodent.

Now start drawing vertical lines from where you would like them to go. This will be the division between our columns.

And to top it off, in the same way, start drawing horizontal lines from beginning to end so that we have a full-fledged table. By the way, we can draw some lines not from beginning to end, but from any other place, for example, from the second line. If something happens, we can always finish drawing what we are missing.

other methods
I will briefly cover two other methods, namely inserting an excel table and express tables. If we use an Excel table, then naturally it will be loaded. This thing is convenient because you can enjoy all the benefits of excel in a Word document, for example.
Express tables are simply ready-made templates that will help make your sign more interesting in terms of design. For example, using them you can create a calendar in one click. But these functions are usually used less often.

Other functions
If you select a table or part of it, you will have a new temporary menu in the ribbon, which will be called "Working with tables". This menu will in turn include two tabs: Layout and Design.
In the "Designer" we can fill our entire structure or individual cells with any color, in addition, you can choose one of the templates that slightly changes the appearance of your table. Well, at the same time you can change the color and thickness of the borders.

But I would like to dwell on “Maket” in a little more detail. Here we have an abundance of different functions that will be useful to us. For example, if you select “Eraser”, then thanks to it you can erase any line inside the table, an entire cell, etc. Sometimes this thing is simply necessary. I use it myself often.
In addition, you can add new rows or columns anywhere, even in the middle. To do this, you need to select one of the options: insert top, bottom, right, left. Although, for good measure, inserting another line can be easier. To do this, just place the cursor at the end of the line after which you want to create a new one.
Another great feature is Sort. For example, you can easily sort the values in any column. Just for fun, let me write the numbers out of order in the first column and we will have 5, 2, 16, 1, 2, 13. Now I will select this column and click on the button "Sort (A-Z)".

After this, a new window will appear where you need to select a specific column by which to sort, as well as a characteristic (number, date, text). But if you select a specific column, then all values will be entered automatically. Well, then we press OK and now everything will be in order.
Best regards, Dmitry Kostin.
Creating a table in Microsoft Word is not difficult. However, for some reason, many users try to insert Excel tables into a Word document! But Microsoft Word has its own tables! You can quickly and beautifully insert them onto the document page! How to do it?
Inserting a table in Word 2010 and later
Place the mouse cursor on the page in the place where you want to insert the table. Go to the tab Insert press the button Table.
First way
In the window that opens, move the mouse cursor over the grid and select the required number of cells in the table. In this case, a table with the specified number of cells will be displayed in the document. As long as you have not left-clicked the mouse, its dimensions can be changed by simply moving the cursor in area 1 (Fig. 1). Having selected the desired dimensions, fix them by clicking the left mouse button. And the table will be inserted into the document. If you need more rows and columns, you can add them later or use method 2.
Second way
On the menu Table select a team Insert table(highlighted with orange frame)

Rice. 2
A window will open in front of you Inserting a table.

Rice. 3
In this window you need to enter Number of columns And Number of lines future table. After you specify the number of columns and the number of rows, click OK
The table will appear on the page:
 Rice. 4
Third way
On the menu Table select a team Draw a table(in Fig. 2). The cursor will take the form of a pencil and you can use it to draw a table to suit your taste.

Rice. 5
All of these methods are available in other versions of Microsoft Word. There is a slight difference in the old version of Word 2003. There the call is carried out like this:
In Word 2003 (Word XP), in the menu Table(circled in red pencil in Fig. 6) select: Insert ==> Table(underlined in red pencil).

Rice. 6
Changing tables
You can change the size of the table by dragging the square in the lower right corner of the table (circled in blue pencil in Fig. 4). You can select the entire table by clicking on the square in the upper left corner of the table (circled in red pencil).
But, more often you will have to do actions on one row or column.
How to select a column? Move the mouse cursor over the table, closer to the top edge of the table. As soon as the cursor turns into a small black arrow (Fig. 7), click on the mouse button and the entire column under this arrow will be highlighted (turn black). If you, without releasing the left mouse button, move the black arrow to the right or left, other columns next to each other will be highlighted. Release the button - the columns will remain selected.

Rice. 7
Now you can do with the text in the selected column all the actions that we covered in the lesson Formatting text in Word - you can change the alignment of the text in the column (center, right, left), you can change the color, font size, etc. .
But in order to clearly see the results of your actions, fill out the table first. After this, practice and develop your skills in working with MS Word tables.

Rice. 8
We learned how to select columns. How can you select rows in a table, you ask?
It's not difficult either. Move the mouse cursor to the left of the table. As soon as it turns into an arrow pointing to the right on the table, press the left mouse button. The line to which the arrow points will immediately be highlighted (see Fig. 8).
If you now, without releasing the mouse button, move the cursor down, other lines will be highlighted. Release the button - the lines will remain selected. You can format the text in the selected rows of the table.
In addition to actions on text in the table, you can perform actions on the rows themselves: delete rows, add rows, merge selected cells, and so on. All this can be done through the menu Working with Tables - Layout(see Figure 8).

Rice. 8
Go to the Layout tab and select the desired action. Just don’t forget to first select the rows or columns that you will “mock”.
Although, it can be made simpler. Select the line and then click right mouse button. will appear context menu with all the actions you can do on a line (see Figure 9)

Rice. 9
Please note that the content of the context menu is different, depending on what you have selected - a row, a column, or the entire table. Select the desired action from the context menu and see the result.
This way you can format the entire table. Align rows or columns centered, right, or left. Highlight the text with color or make it bold. You can change the font size, etc. You can also add rows or columns, merge cells, etc.

Rice. 10
As a result, the table may look like mine in Fig. 10. Oh, you can do it differently, as you like.
Good day to everyone, my dear friends and guests of my blog. Today, if you don’t mind, we will continue to tinker with the Microsoft Word text editor. Due to my line of work, I often have to deal with him, so I can’t ignore him.
And today we will work with tables. Yes. Without this, our business is simply nowhere. But many people don’t even know how this can be brought to life, much less in several ways. Therefore, I will tell you how to draw a table in Word, using several different options and methods. I will do this as usual in Office 2013, but if you have 2010, then this article will also be relevant. Ready? Then let's go!
Insert
Our first method will be the simplest and most classic, namely a regular table insertion. We don't need any supernatural abilities here. You just need to set the number of rows and columns.
Log in to Word and go to the “Insert” menu, then select “Table” and visually use the squares to select what your table will look like in real time. If you are satisfied with everything, then simply click the left mouse button at the desired point. True, this line has a limited number of rows and columns. In this case, another option will help us.
To set a certain number of columns and rows, we need to enter the same section again, only this time select the item "Insert table".
A new window will appear where you will be asked to select the required number of rows and columns.
Drawing
A fairly convenient way to create a sign is to draw it. That is, here you yourself choose initially what it will look like for you. In order to bring this to life, we need in the same item “Insert” - “Table”, and then click on "Draw a table". Your cursor should change to a pencil.
We will use this pencil to draw our sign. To do this, hold down the left mouse button on one edge and move it to the other lower edge, after which we release our rodent.
Now start drawing vertical lines from where you would like them to go. This will be the division between our columns.
And to top it off, in the same way, start drawing horizontal lines from beginning to end so that we have a full-fledged table. By the way, we can draw some lines not from beginning to end, but from any other place, for example, from the second line. If something happens, we can always finish drawing what we are missing.
other methods
I will briefly cover two other methods, namely inserting an excel table and express tables. If we use an Excel table, then naturally it will be loaded. This thing is convenient because you can enjoy all the benefits of excel in a Word document, for example.
Express tables are simply ready-made templates that will help make your sign more interesting in terms of design. For example, using them you can create a calendar in one click. But these functions are usually used less often.
Other functions
If you select a table or part of it, you will have a new temporary menu in the ribbon, which will be called "Working with tables". This menu will in turn include two tabs: Layout and Design.
In the "Designer" we can fill our entire structure or individual cells with any color, in addition, you can choose one of the templates that slightly changes the appearance of your table. Well, at the same time you can change the color and thickness of the borders.
But I would like to dwell on “Maket” in a little more detail. Here we have an abundance of different functions that will be useful to us. For example, if you select “Eraser”, then thanks to it you can erase any line inside the table, an entire cell, etc. Sometimes this thing is simply necessary. I use it myself often.
In addition, you can add new rows or columns anywhere, even in the middle. To do this, you need to select one of the options: insert top, bottom, right, left. Although, for good measure, inserting another line can be easier. To do this, just place the cursor at the end of the line after which you want to create a new one.
Another great feature is Sort. For example, you can easily sort the values in any column. Just for fun, let me write the numbers out of order in the first column and we will have 5, 2, 16, 1, 2, 13. Now I will select this column and click on the button "Sort (A-Z)".
After this, a new window will appear where you need to select a specific column by which to sort, as well as a characteristic (number, date, text). But if you select a specific column, then all values will be entered automatically. Well, then we press OK and now everything will be in order.
Best regards, Dmitry Kostin.
I learned how to make a table in Word shortly after I started using a computer full-time. School assignments, helping parents - harsh living conditions forced me to learn quickly.
In Word, a table is needed only to organize data. If you need to make some calculations, for example, find out the sum of numbers written in one column, then welcome to Excel. Everything there is initially divided into graphs, and the necessary functions are there.
How to create a table in Word
Creation methods
Word offers several options for creating a matrix. You are free to choose any method, but each has a specific purpose. To see the available options, go to the Insert tab and click Table.
What we see here:
- Insert – use the mouse to select the number of columns and cells.
- Insert – specify the number of columns and select the width.
- Draw - the course turns into a pencil, which you can literally use to draw a sign.
- Transform – if you select text and select Transform, what you have written will be enclosed within borders.
- Excel – inserts a small window from Excel. You can make calculations if you know the formulas.
- Express tables are ready-made templates for insertion. Convenient if you need to add a calendar, double table or subheadings.
A short description will not be enough: now we will try to put some of the listed methods into practice by creating different timesheets, registers, statements and other boring things.
If you have Word 2007 or higher, then you can safely use all the recommendations below, because changes in the interface in recent years have been minor. If you have Word 2003 on your computer, then I have bad news: it’s already 2016, this software is infinitely outdated. But you can also insert a sign in it:

The width parameters require some explanation:
- “Constant” and “Auto” – the columns will be of equal width, which will be selected automatically. “Constant” and a specific size - you specify the width yourself.
- “By content” – will be selected based on the largest contents of the cell. This, by the way, is very convenient if you need to enter a lot of characters.
- “Fit to window width” – no matter what you write there, the cells will still be evenly stretched across the entire width of the document.
If you then right-click on the plate, you can merge or delete cells, as well as color them in different colors. This will be your homework.
In Word 2007, 2010, 2013 and 2016, the operation is performed in a similar way, the only difference is the need to open the “Insert” tab. This tab is needed to perform many actions, including. 
More modern versions of Word have another handy feature. You can not write the number of columns, but simply use the mouse to select them and left-click. Give it a try.
Drawing a table
Okay, I got carried away, Word 2003 is not so terrible, but it is much more convenient to analyze the functions of a text editor using the example of something more recent. Moreover, now we will talk about drawing. Open the Insert tab. Click on the button and select draw. 
The cursor will turn into a pencil and the Design tab will appear. First draw the borders. Then, using the same pencil and eraser, make internal markings. Here you can use your imagination - make cells of different levels, remove borders. Even I couldn’t draw clumsily, although my drawing skills have long become a “standard” of inability among my friends.
When the sign is ready, double-click with a pencil on an empty space in the document so that the cursor appears again. You can fill in the drawn graphs. To add beauty, unless, of course, it is a dissertation or other document of a strict form.
Miraculous transformation
Everyone loves miracles. So select the text you want to enclose in columns and cells, go to the Insert tab and select Convert. Without selection, this button will be highlighted in gray. 
A window will appear in which you can select the number of lines, width and separator sign. Set the options and click OK. Not the most convenient function, I never use it at all, but you need to know about it at least for general development.
But this is a cool thing that can seriously save time. Office work = monotonous documents. Among the express tables you can find several good templates, but this is not the main thing. 
The main thing here is the ability to create a template yourself. You draw a table using one of the above methods, select it with the cursor, open the “Express Tables” section and click “Save Selected Fragment” at the bottom. As a result, next time you won’t have to insert/draw anything; you just need to select a template.
A special Excel editor has been developed for working with tables, but it is not necessary to understand such a difficult method in order to create a simple table. You can make a table in Word quite simply and quickly, without any special obstacles and at the same time save a lot of time. There are several ways to create a table; we will consider each separately and provide visual drawings.
Creating a table in Word 2007, 2010, 2013 and 2016
In the latest versions of Microsoft Word, the functionality is not very different from each other. Therefore, let us first analyze the improved versions of the program. So, to make a table, you should follow the step-by-step instructions, after selecting the appropriate option.
Limited table size 10ˣ8
Creating a table without size restrictions
If you have to draw a complex table with a huge number of columns and rows, then this method will be relevant. The following steps need to be taken:


The maximum number of columns is 63, and the number of rows is more than 1001.
Drawing a table with a pencil
For creative types, there is a way to have fun while creating a table. You will have to draw the table with a pencil. Here's how to do it:


Excel table style
If necessary, you can create a table as in Excel, with identical styles. To do this, you need to take the following steps.

Express tables
The advanced functionality of the Word text editor allows you to build a beautiful diagram using express tables. All you need to do is open the “Insert” tab. Next, click on the “Tables” and “Express Tables” icon. Now select the desired option from the drop-down list.